Tuesday, August 8, 2017

Happy Birthday

Today I'm sharing a vintage style birthday card made using punches, patterned paper, vintage book pages,  and rubber stamps.  The layout of this card is a personal favorite, because it lends itself to so many different looks; change the floral paper to a more industrial or masculine print, and you have a birthday card for the man in your life.  Change out the ribbon for burlap trim, antique lace, or silk ribbon for a totally different look.
I created the card by layering the different papers, then stamping on both the background and the book page for a different effect.  I also stamped with my stitching stamp on the floral paper; I don't sew, so this stamp is perfect for me!  The checked border is washi tape.  

Thanks for visiting!  

Saturday, July 22, 2017

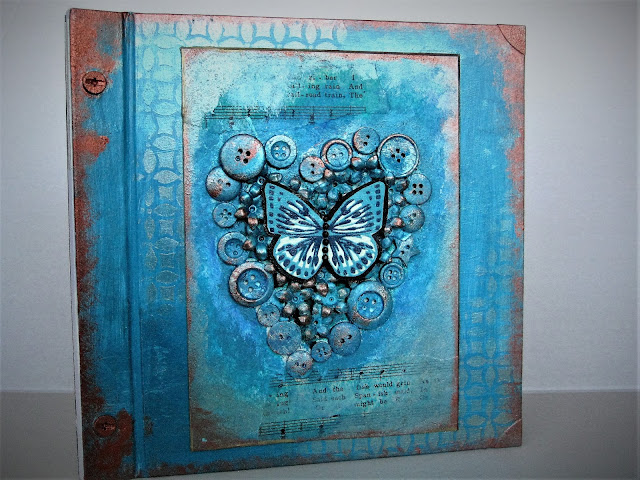
Mixed Media Heart

Hello and thanks for stopping by!  Today's post is a book that I bought from the dollar section at Target and then altered.  I have had the book for quite some time; I tend to buy "blank" items, intending to alter them, and then feel intimidated by the process!


This book was made of a stiff cardboard, so it was simple to cover with gesso in preparation for painting.  After the gesso dried, I used a base coat of sky blue acrylic paint, later sponging in sections with metallic blue acrylic.  Using a heat gun to speed up the process, I dried the base coat so I could use a stencil on 2 of the corners.  Finally I sponged metallic copper acrylic around the edges and the metal parts of the book to add a vintage look.

The heart was created using buttons and flower beads from my stash.  I chose the buttons based on their shape and size; color didn't matter in this project since I was painting over the entire thing.  (mental note here....don't throw out ugly colored buttons!!!)  After gluing the buttons and beads into the heart shape, I covered the whole thing with gesso so it would accept the acrylic paint later.

I added torn pieces of vintage sheet music to the corners of the piece before sponging on a variety of blue, copper, and moss green metallic paints.  I hunt for vintage sheet music books at church rummage sales or estate sales; you can also find them at library bookstores.

The butterfly is from a piece of art paper a friend was getting rid of; I backed it with black cardstock to give it some strength and added black rhinestones.

This post is entered in the Simon Says Stamp Monday Challenge: Get in Shape and A Vintage Journey's Challenge: All Squared Up

Thanks for visiting!  I welcome your comments!

Thursday, July 13, 2017

Vintage Beauty

Hello and thanks for stopping by!  I'm so excited about this technique I'm showcasing today, it is really fun to do and leaves room for lots of creative possibilities.  The backgrounds for both of these below are from napkins.  Be sure and separate the layers of the napkins before adhering to your paper!  Most napkins have at least 2-3 layers, and if you don't separate them, the top layer will peel off while you are working on your piece.

After your napkin layer has dried (which you can speed up with a heat gun or hairdryer), your image comes next.  You can either cut out a face from a magazine page and glue it to your piece, or you can print out faces from your computer...this leads to all kinds of possibilities, from printing a face of a friend or family member, a famous singer or celebrity, or, as I have done, using actresses from the 1940's and 50's.  I confess I don't remember who this actress is, if you recognize her, let me know!  


                                                   After gluing down your face image, it's time to gesso a bit.  I used gesso around her face and her shirt.  Next I painted her face, hair, and shirt. Honestly I pretended to be a make up artist while painting her face!    I added the bottom banner using stickers and patterned paper.     Her hair is accented with clip art (butterfly and flowers) as well as faux flowers.             


Do you recognize this actress?  I completed this piece in pretty much the same way as the other, except I added trim to her sweater and used a stencil on her sweater to add a bit of depth.  


I hope you try this technique if you haven't already.  It was lots of fun and opens the door to using a variety of mediums.  As always, I'd love to hear your comments!  Thanks for visiting!


Sunday, July 9, 2017

Quick and Easy Card

Hello and welcome!  My card today features a stamp from Sin City Stamps.  A friend of mine, Michelle Frae Cummings, is the inspiration design team leader there and has her own blog as well, Faerie Dust Dreams.  I really like this stamp because of it's simple design.  It's great for making a bunch of quick cards in one sitting.  If you visit Sin City, be sure and check out some of their other stamp designs; there is another dandelion stamp designed by Michelle that is great for backgrounds!


Wednesday, July 5, 2017

Celebrate Freedom!

Today's post is a journal page I created for my son's favorite holiday, Independence Day.  First I stamped stars along the right edge of the page.  Then I stamped "freedom" and some stars on torn white tissue paper and adhered them to the piece.  I wanted to blur the edges of the tissue after it dried, so I painted blue and red acrylic paint along the edges of the tissue paper.  I used a star stencil with silver Inka Gold to add more dimension, and adhered some blue metallic stars as well. The red polka dots are washi tape.   Let freedom ring!


Saturday, April 8, 2017

Romantic Journal

I haven't posted in quite awhile due to taking on a new full time teaching position teaching transitional kindergarten!  Needless to say, the job has required quite a bit of time and energy, leaving me less time to do anything creative in my studio.  Finally I feel like I have a handle on things and can get back to doing something else that I love.

I recently joined an art journal club so I can get inspired and continue on my mixed media journey.  These journal pages were inspired by the word "love." The backgrounds were made using my Gelli plate and a mix of circle stencils and bubble wrap.  I take my journal pages out of the journal to work on them, then adhere them back in the journal when I'm finished.  (then if they don't turn out like I'd like, I can start over easily!)

The floral images along the sides of the journal are napkins.  I love using printed napkins on artwork; there are so many beautiful patterns to choose from.  Just be sure and take off the extra layers (usually 2 or 3) before adhering with modge podge or glue.

The rest of the piece has a variety of items, including washi tapes, vintage sheet music, stamps, patterned paper, and fabric trim.  The "26" refers to the number of years I have been married to my wonderfully understanding husband who is very supportive of my hobby!


Thanks as always for visiting!  Please feel free to comment!  

Wednesday, November 9, 2016

Make a House a Home

My friend Michelle from Faerie Dust Dreams was recently cleaning out her studio and gave me a bunch of her stash...what a great friend!  You know what they say about one woman's trash being another woman's treasure...  Some of the items were small wood blocks, which I decided to make into little houses.  I started by painting each one with acrylic paint, then accenting with Inka Gold.  Each house is a little different, with either stamping or rub-ons to decorate.   The roof of each house was just a strip of thin cardboard, folded and painted, then embellished with stamping, rub-ons, or punched shapes.


I made a door for each house using thin cardboard (cereal boxes are great for this) then painting with acrylic paint.  The door "handles" are brads and each door is accented with Inka Gold.  Inka Gold is a thick metallic paste/paint that comes in a variety of colors...I use gold and silver the most, but I also have a beautiful lime green, bright metallic blue, and copper. You can apply it with a brush, but I usually use my finger.


The green house door has a heart cut out of the same paper I used to make the crown.  I realized later I should have paid more attention to the words on the heart.  I have no idea what those words are!  Next time I'll cut out the heart so you can actually read a word on it.


Each crown was made out of paper and then accented with Inka Gold and little jewels.  A big dollop of clear glue holds the crowns in place.

After quite a bit of trial and error, I'm finally getting better at taking photos, especially close-ups.  Taking photos was one of the reasons I put off creating a blog for so long.  The technical part of the blog (uploading photos, editing photos, posting, managing) was another reason I put off the blog.  I wanted to share my art, not fuss with my computer!  Again, through some mistakes and lots of practice (and asking my daughter for help, you should see her roll her eyes...) things seem to be coming along nicely.


Thanks as always for stopping by!

Materials:

*wood blocks
*acrylic paint 
*Inka Gold 
*thin cardboard
*brads, stick on jewels
*rubber stamps, rub-ons
*patterned paper for crowns